
How to Excise Microsoft From of Your Colon Quickly and Painlessly
A step-by-step guide to enjoy Windows without the spying, nagging, or Copiloting.
 By Steven Cleamer
- 02.07.2026
-
Share on XShare a link to this article on your X feed.
-
Share on FacebookShare a link to this article on your Facebook feed.
-
Send to a Friend or EnemySend a link to this article via e-mail to a friend or enemy.
-
Share LinkCopy a link to this article to your clipboard.
- Jump to CommentsView the comments for this article.
Windows has changed a lot over the years, transforming from a relatively simple operating system to a complicated, cloud-feeding machine that can cripple the entire planet with a single update. It's become such a shell of its former self that I yearn for the days of Steve Ballmer on a sweaty cocaine bender screaming about developers.
To make things worse, AI has joined the party. With Copilot now riding shotgun as it takes a tour of my rectum, it's almost impossible to maintain any control of my information, let alone get a decent trade-in value on my kidneys so I can add more RAM to my PC. However, there are still ways to revert Windows back to the localized, non-autonomous OS it used to be.
Welcome to Mental Discharge's guide to excising Microsoft from your colon quickly and painlessly. If you want nothing to do with OneDrive, 365, Copilot, or Windows behaving like a handsy creep at a shitty bar, you've come to the right place. With just three utilities and a couple of optional settings tweaks, you'll have a PC that won't send nudes of you to Redmond, log every single click and keystroke you make, nag you about updates that break shit, or turn your Start Menu into a landfill of sponsored garbage.
As always, backup your data before trusting strangers with your box. All set? Let's get started.
Step 1: Get Rid of Your Microsoft Account
What is a Microsoft Account, you ask? It's your identity, device information, settings, personal files, typing habits, stool samples, software installation data, and usage behavior sent to the cloud and cradled in the warm, gentle hands of Microsoft. It's a completely unnecessary feature for the vast majority of PC users who simply want to shitpost memes on social media, watch pirated movies on Plex, or go on an unhinged, antisemitic tirade in Fortnite. Microsoft claims it's a means to improve your experience, but it's really just a census to determine how quickly Skynet kills you when the machines take over.
If you don't have a Microsoft Account, you're already ahead of the game and can skip to the next step. If you're setting up a new system, there is a hidden method to avoid creating one. If neither of these apply, let's continue.
I Already Have a Microsoft Account
If Windows already tricked you into signing up for a Microsoft Account, you can easily switch back to a local one.
1 Go to your account settings and turn that shit off.
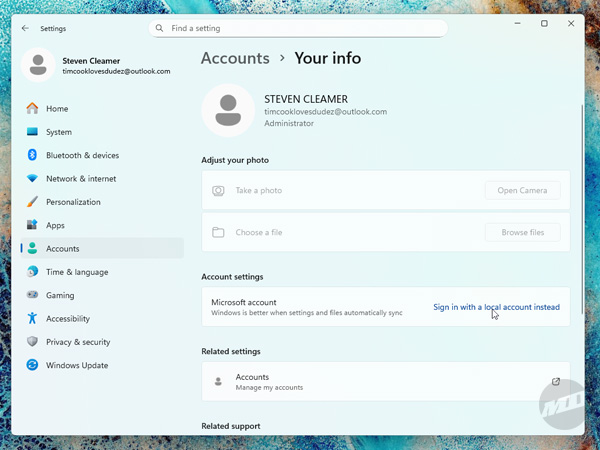
Go to Settings > Accounts > Your info and click "Sign in with a local account instead."
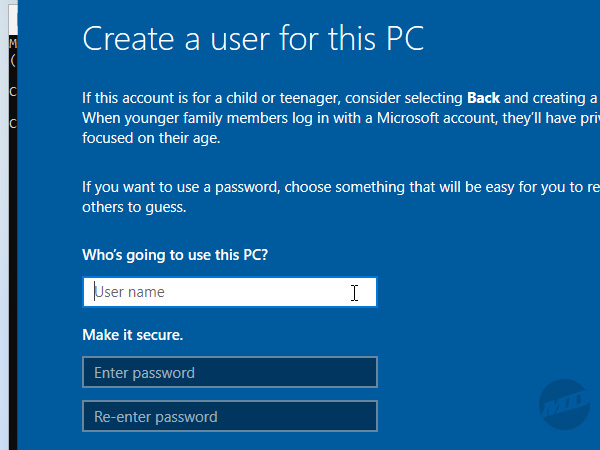
2 Enter a user name and enjoy a local account like it's 1995.
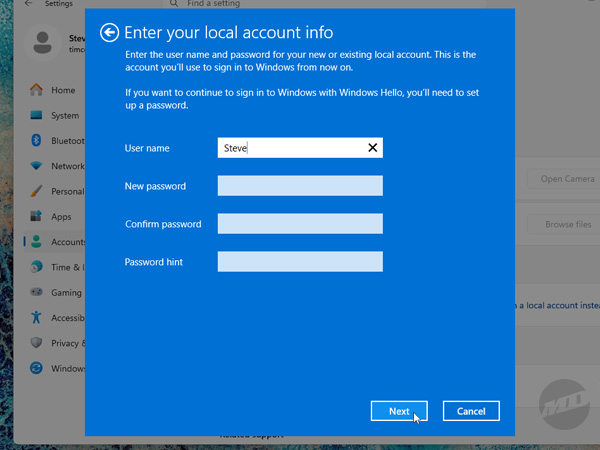
Windows may bitch and complain that a local account is for losers. Don't give into the hate. Punch in whatever password or PIN you originally set, confirm your user name, click the "Next" button, and let Windows restart your machine.
Now that Microsoft is no longer cozying up to your prostate, you can proceed to the next step.
I'm Setting Up Windows For the First Time
If you're setting up Windows for the first time, the option to decline a Microsoft Account was removed back in later versions of Windows 10. But fear not. With a couple of keystrokes and a command-line prompt, you can avoid Microsoft from setting up shop inside your anus.
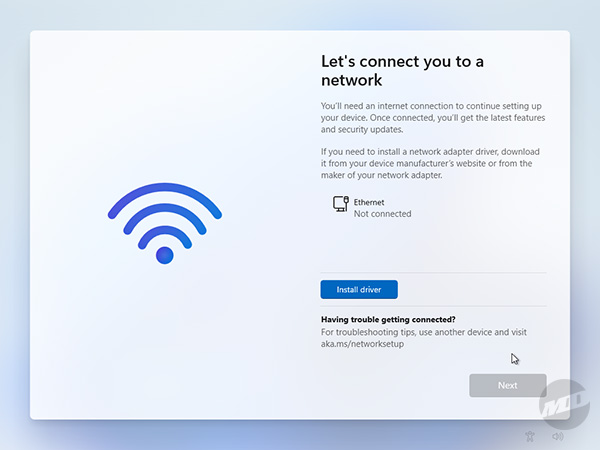
Before you begin this process, make sure there is no ethernet cable plugged in. Likewise, don't connect to any Wi-Fi networks when Windows holds your machine hostage during its initial setup. If you already did, you're kinda boned. Finish setting up the account and then scroll back up to see how to switch back to a local one after you're delivered to your desktop.
1 Let's connect you to a command prompt.
When Windows demands you to connect to the internet and tries to gaslight you into sharing your life story with Microsoft, don't. Don't plug in an ethernet cable and definitely don't connect to a Wi-Fi network. Instead, press SHIFT-F10 (or SHIFT-FN-F10) on your keyboard to launch a command prompt.
2 Punch in the following command like a l33t hax0r.
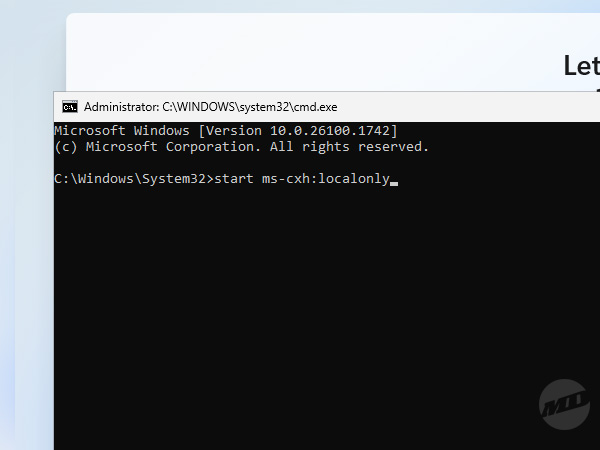
From the command prompt, type in start ms-cxh:localonly and press Enter to launch a window allowing you to set up a local account and bypass Microsoft's demand to take a seat on that odd-smelling leather couch next to the door.
3 Make Jennifer Aniston and the ghost of Matthew Perry proud.
Enter your user name and an optional password, circumventing Microsoft's giant, unlubricated colonoscope. Windows Setup will continue to install and you can connect to the internet once you're at the desktop.
Step 2: Remove All the Garbage Windows Comes With
With Microsoft starting to feel the pressure of a fiber-rich diet coming its way, it's time to start eliminating all the garbage Windows comes with. Not even your dementia-riddled grandma has any desire to use Microsoft Bing, News, Sticky Notes, To Do, or whatever the fuck Dev Home is.
You could try to remove these items one by one, but a much faster way is to use O&O Software's AppBuster, a free utility that allows you to remove apps, including those embedded into Windows, in one fell swoop.
Download AppBuster
Get O&O Software AppBuster from their website at https://www.oo-software.com/en/ooappbuster.
Why AppBuster?
AppBuster is so simple and easy that a legal secretary who's sat in front of a computer for three decades and still doesn't know what the Start Menu is can use it.
1 Fire up AppBuster.
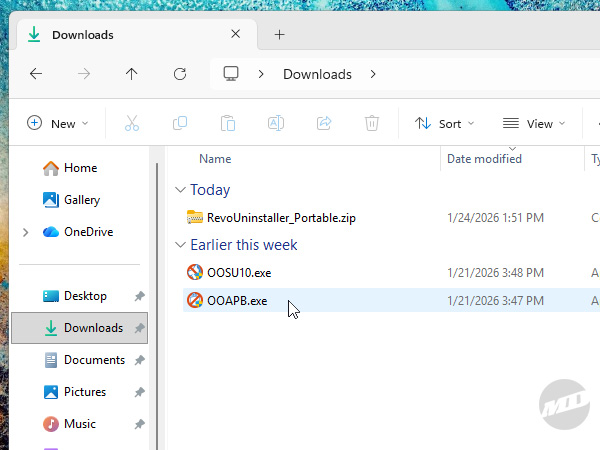
Download AppBuster, navigate to whatever folder you keep your downloads in, and double-click on OOAPB. A User Account Control window will appear, asking if you're sure you want to allow an app to run that lets you remove a parasitic collection of preinstalled trash from your machine. Yes, you absolutely do.
2 Select all the useless Windows apps to remove.
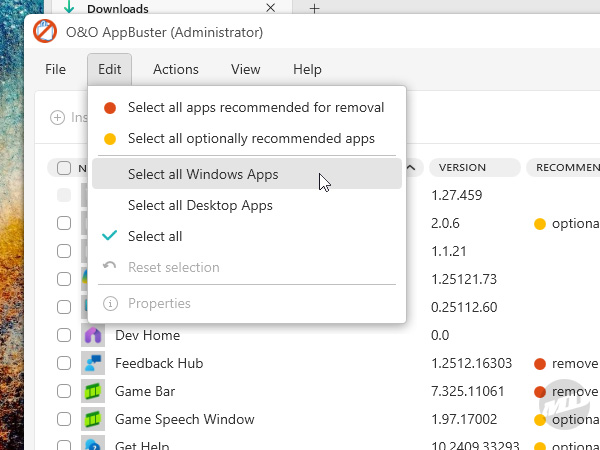
Once AppBuster has displayed the entire list of installed apps, click on the Edit menu and select "Select all Windows Apps." This will automatically check all of the spyware, bloatware, and apps infested with AI included with Windows. It won't pick anything outside of the Microsoft metaverse, so you might want to also select some of the extra junk that came from the device manufacturer. Browse the list and add anything else you want removed.
Here are some considerations for a few items to keep:
Application | Reason |
Microsoft Visual C++ Redistributables | These contain essential components required for certain software. They don't contain AI, don't run in the background, and are only used when needed by their associated apps. |
AV1, AVC, HEIF, HEVC, MPEG-2, VP9, Web, WebP Extensions | These codecs allow Windows-specific software, such as File Explorer, to display various media formats. Third-party apps can support them independently, but keeping them installed is harmless. |
Windows Terminal | Windows Terminal is a built-in tool that lets you type simple commands to control and fix Windows. It can be worth keeping to solve problems when normal menus and settings aren't functioning. |
Of course, if you come across an app you installed yourself or you see something you don't want to get rid of, don't check it. You don't have to remove everything just because I said so. I ain't your pappy.
3 Click the Remove button.
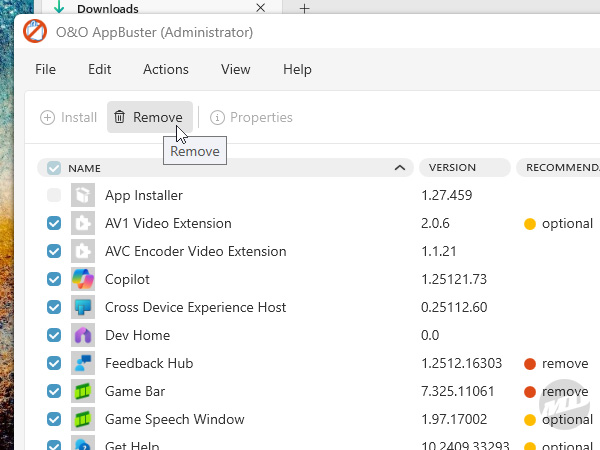
Once you've selected all the apps you want deported, click the Remove button towards the top of the window.
4 Choose how final the solution should be.
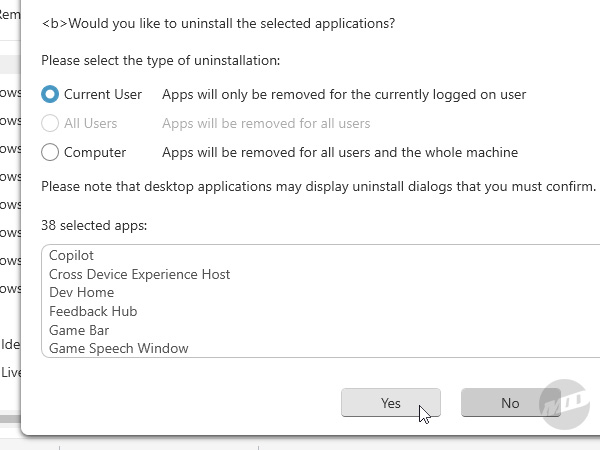
AppBuster will now ask you how you'd like these items removed. I recommend leaving "Current User" selected. After clicking "Yes" to confirm, you can choose to create a Restore Point in case things go awry, then watch the magic happen as AppBuster goes through and gives Windows a much-needed enema.
You can select "Computer" if you'd like, but each individual app will spit out an error and return you to the app list. The app does actually get removed, but you'll have to repeat this process each time and it can become tedious.
Most Windows apps will silently uninstall, meaning you can sit back and relax as they shed their digital coil. However, some apps may launch prompts that need additional confirmation or guilt-trip you into letting them stay. Click the appropriate buttons to facilitate their removal.
Double check to make sure everything was removed as stragglers can sometimes be left behind. Apps such as OneDrive and Microsoft 365 may need to be selected for annihilation again, despite AppBuster saying everything was removed successfully. Apps that don't cooperate being removed en masse can be taken care of the old-fashioned way through Settings.
Once you're finished, you can close AppBuster.
Leftover App Removal
AppBuster doesn't always get everything. Manufacturer-provided bloatware such as McAfee, HP JumpStart, MyASUS, and other useless included with your machine sometimes have to be removed manually.
There can also be apps sitting in your Start Menu that didn't even appear on the app list to begin with. These are technically advertisements, apps that aren't actually installed on your machine until you click them for the first time. Icons such as LinkedIn, Spotify, Netflix, or Candy Crush can randomly appear pinned to your Start Menu, waiting for you to succumb to weakness, but are removable just the same.
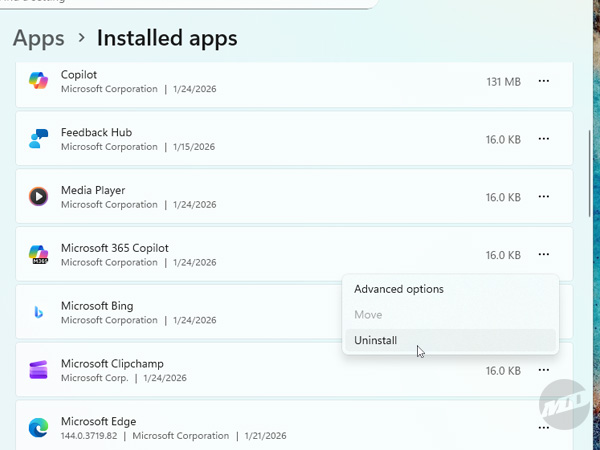
To remove apps that don't want to cooperate with AppBuster, go to Settings > Apps > Installed Apps and scroll down the list to the app you want to uninstall. Click the three little dots on the far right, select "Uninstall," and boom! Bob's your creepy uncle we don't talk about at dinner.
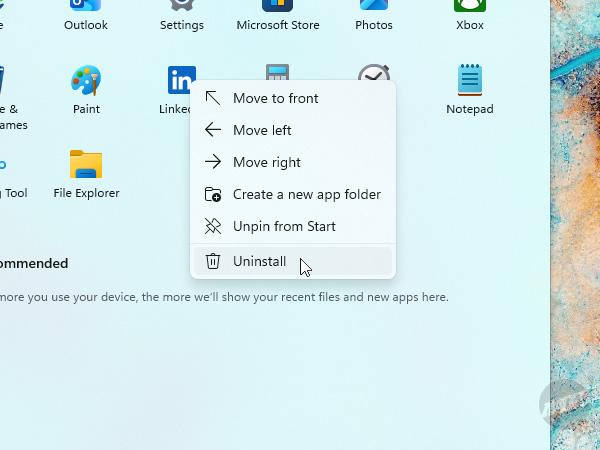
Getting rid of advertisement apps is even easier. Open up your Start Menu, right-mouse click on either a pinned icon or one inside the entire app list, select "Uninstall," and boom! Bob's your creepy uncle who forgot to check-in with his parole officer.
Step 3: Turn Off the Tracking, Telemetry, and AI
The next step in getting Microsoft to stop comfortably resting its mushroom cap on the top of your crack is to disable the OS's tracking, telemetry, and AI features. We've wiped out the apps that do it, but Windows itself still sends anonymous usage data to Microsoft while trying to spam the holy hell out of you with ads disguised as suggestions.
O&O Software offers another great utility called ShutUp10++ that allows you to disable Copilot, unwanted access to hardware and files, location sharing, data collection, transmission of weird habits you're into, and much more.
Download ShutUp10++
Get O&O Software ShutUp10++ from their website at https://www.oo-software.com/en/shutup10.
Why ShutUp10++?
Sure, you can feel like a cool hacker as you blindly execute GitHub scripts from a terminal, but ShutUp10++ is another standalone app that requires no installation. It removes spyware, AI, and the wife-like nagging of Windows with the mere toggle of switches.
1 Fire up ShutUp10++.
Nab ShutUp10++, open up your downloads folder, and double-click on OOSU10. Another User Account Control window will pop up to cockblock you, asking if you want to make changes to your computer. You're goddamn right you do.
2 Turn every single thing off. Yes, everything.
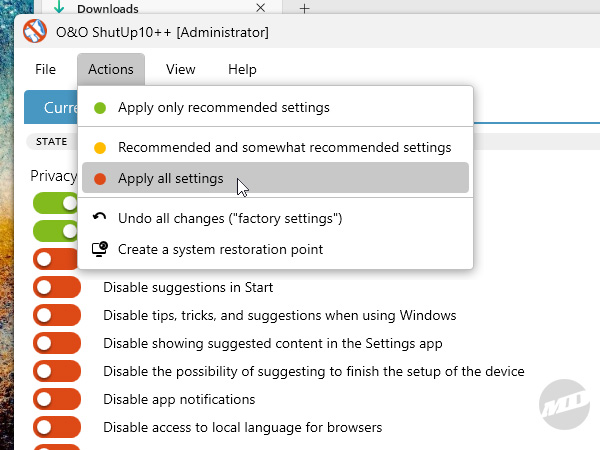
We'll loosen the reins here in a moment, but start off by disabling everything. All of it. Go to the Actions menu and select "Apply all settings." This will turn every switch green which means its corresponding feature is disabled. This will stop Copilot, usage and search habits getting sent to Microsoft, the Start Menu being used as a Bing search, suggestions for things you didn't ask for, tracking of God knows what, feedback nonsense, notification spam, connected experiences, input personalization, and any other paranoid sociopathic tendencies Windows has. You'll be prompted by ShutUp10++ if you'd like to set a Restore Point just in case shit hits the fan.
3 Turn a few key things back on.
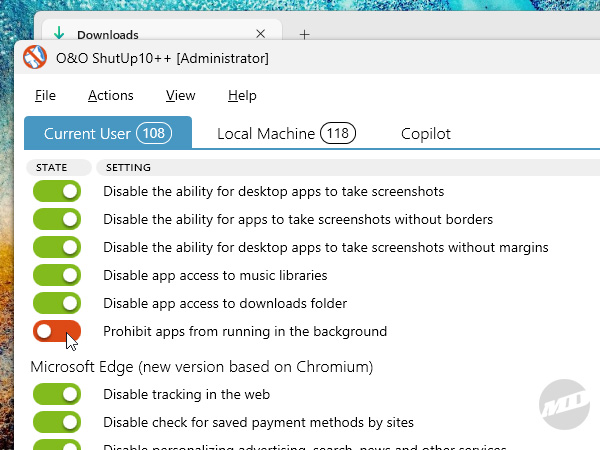
Now, you don't actually want every single option here disabled. The reason we toggled it all at once is to save time not having to click a bazillion switches. Yeah, that's how much spying Windows actually does. Here's a list of features you should turn back on (which is red, actually) and why:
Setting | Reason |
Disable app access to camera | If you've got a camera or a microphone, you'll want both of these enabled (red) so your software can use them. If you don't, lock that shit down (green). |
Disable app access to notifications | This is optional, but if you want to get notifications from apps, you'll want to leave this enabled (green). Most of Windows will be locked down pretty tight and shouldn't spam you too much, but if you don't want any notifications whatsoever, keep this disabled (green). |
Prohibit apps from running in the background | Disabling this freezes any app that isn't in focus. If you use software like Steam, Discord, media players, or anything else that does business in the background, disabling this option (green) prevents it from operating unless it's up front and center. Staring at a Steam download sounds really boring, not to mention you paid a lot for that processor that doubles as a space heater, so let your software do its thing (red). |
Do not show recently opened items in Jump Lists on "Start" or the taskbar | Leave this feature enabled (red) so that recent files you've used in an app are accessible from the taskbar, Start Menu, or as frequently used Quick Access locations in File Explorer. |
It certainly doesn't hurt to go through all the various settings and see if there's something you might want enabled (green), but almost none of these are necessary to enjoy a clean, non-invasive Windows environment. Most toggled switches actuate changes instantly, but some will require a restart.
4 Remove any remaining Copilot leftovers.
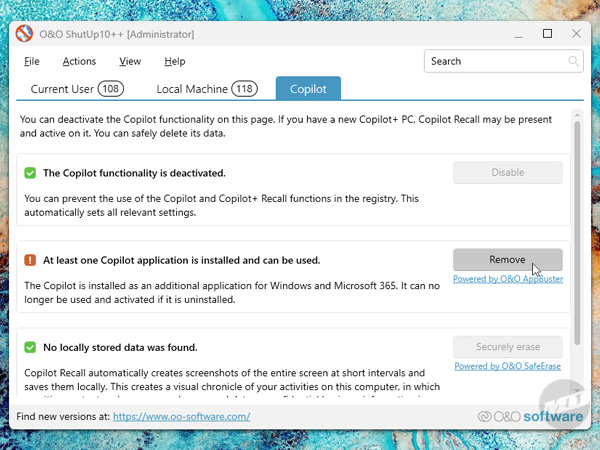
Last, but certainly not least, you'll want to make sure any remaining Copilot remnants are truly gone, such as Recall, a feature that allows searching through past activity by letting AI literally watch you use your computer. Click the Copilot tab at the top of the window to show additional removal tools to eliminate any last bit of Microsoft's desperate attempt to violate your privacy. Whatever buttons remain visible should be clicked to put the final nail in the coffin.
You're done here. ShutUp10++ will likely prompt you to restart when you close it.
Step 4: Get Rid of Microsoft Edge
The final step in eliminating the remaining traces of contempt Windows has for you is to get rid of Microsoft Edge. Of course, before doing this, you should download a browser. Once you've got Brave, Firefox, or whatever you fancy installed and ready to go, it's time to procure the last tool in your arsenal of digital freedom. Revo Uninstaller is another free utility that will happily take any app on your machine embedded tighter than a wisdom tooth growing in sideways and yank it out.
Download Revo Uninstaller
Get Revo Uninstaller Portable from their website at https://www.revouninstaller.com/start-freeware-download-portable.
Why Revo Uninstaller?
Microsoft won't let you remove Edge because you can't live without it. Bullshit. Become ungovernable. Revo Uninstaller not only will uninstall Edge, but remove all traces of it faster than a gunman on a slanted roof. It'll dig through registry entries and temporary files to make sure whatever you want gone regrets it ever crossed paths with you.
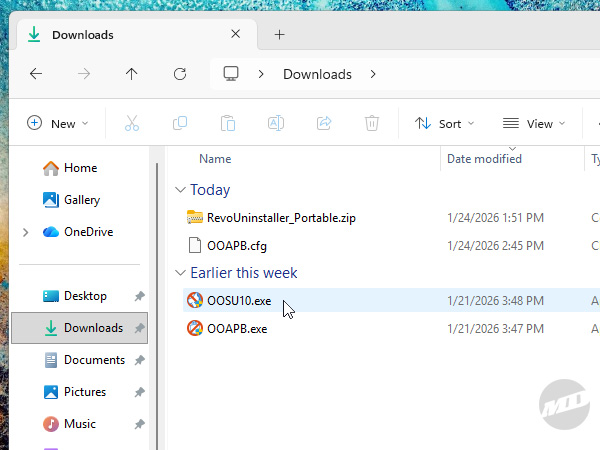
1 Fire up Revo Uninstaller.
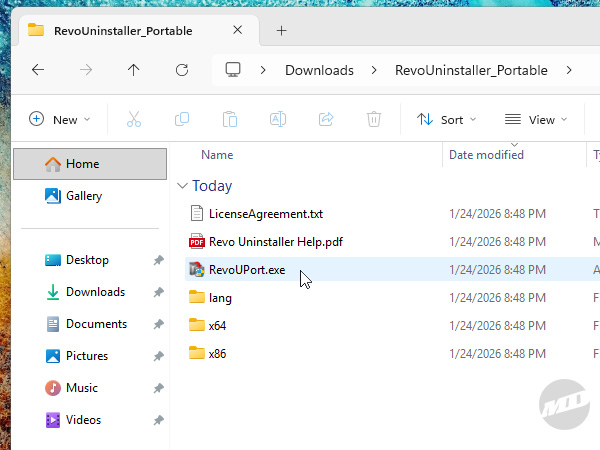
Snag Revo Uninstaller, extract the zip into your downloads folder, double-click on the RevoUninstaller_Portable folder it creates, then double-click on RevoUPort. User Account Control will pop up to white knight Windows as you're about to deal the killing blow. Yes, you son of a bitch, I'm sure.
2 Select Microsoft Edge, then start laughing manically.
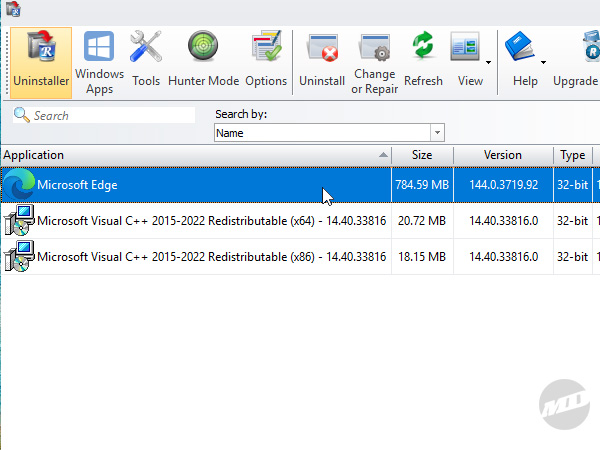
Revo Uninstaller will display a list of apps not unlike AppBuster, but we're only here for Microsoft Edge. It should be easy to find considering how nice and clean the machine is at this point. Don a confident, smug look on your face as you double-click it.
3 Be sure that you're sure. I'm sure. Are you sure?
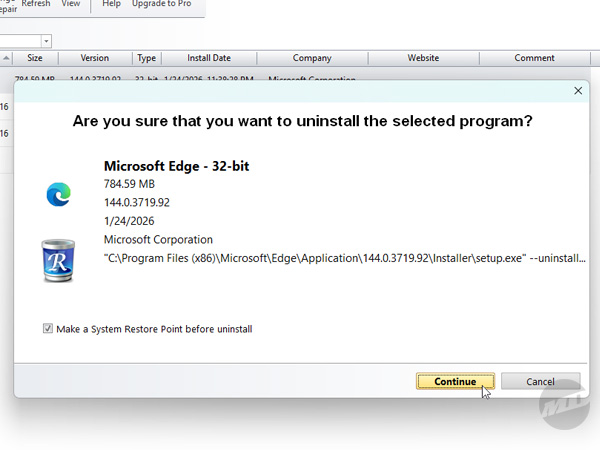
You'll be warned that removing Edge may cause some Windows features or other software to not work correctly, but you've run out of fucks to give. Click "OK" to be presented with another screen that'll give you the option to create a Restore Point before you continue.
4 Select how deep you want to go.
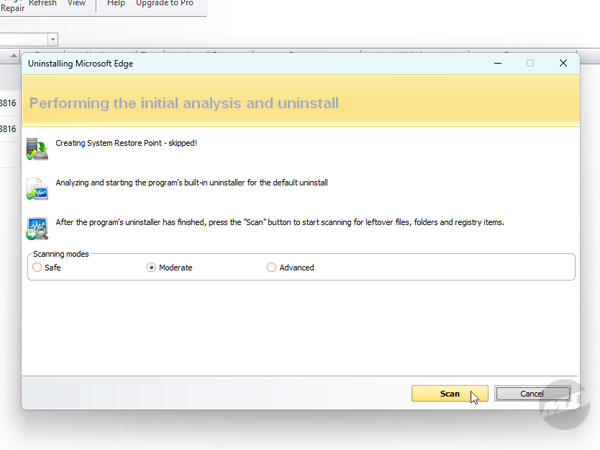
Revo Uninstaller will give you three choices on how to proceed. This determines how deep you want it to go in removing anything that survives the initial uninstall. Since Edge doesn't have a true, actual uninstaller, registry entries and file locations will be targeted immediately. Moderate is fine and already selected, but you can go Advanced if you like. Click "Scan" to begin the hunt.
5 Delete all of Edge's registry entries.

The next screen will show the resulting registry entries associated with Edge that can be deleted. These are what embed Edge into Windows, not unlike a gut organism after a week of Indian street food. Click "Select All" if the entries aren't already selected, then click "Delete" to proceed. Once the registry items are wiped from existence, Revo Uninstaller will take you to the last step. Clicking "Next" shouldn't be necessary here.
6 Delete all of Edge's files.
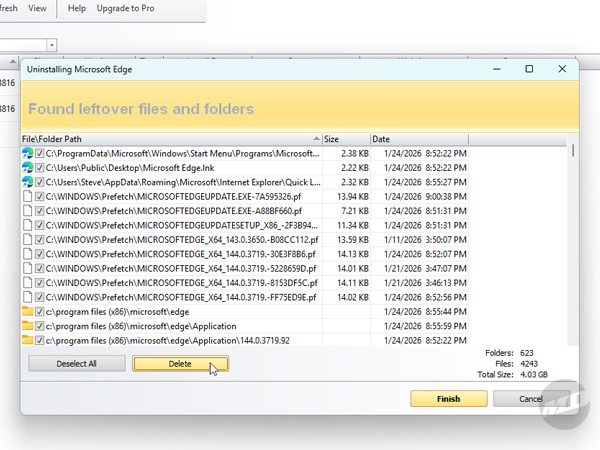
The last stop on this magical journey is a laundry list of the files associated with Edge. Again, click "Select All" if the files aren't already selected, then click "Delete" to remove the files. Don't fret if you still see some listed as these will require a reboot to get fully removed. Click "Finish," close Revo Uninstaller, restart your machine, and they'll be dealt with quietly and efficiently.
Congratulations! You've successfully removed Microsoft Edge! Suck it, Satya.
Final Tips
If you're a fan of Microsoft sending your machine random nature wallpapers it cycles through, you can ignore this step, but be aware that the beautiful landscapes it delivers still falls under the umbrella of data collection and privacy concerns.
1 Turn off Windows Spotlight. You can spotlight deez nuts. Gottem.

Go to Settings > Personalization > Background and select "Picture" from the menu on the right under the "Personalize your background" section. Select one of the goofy stock Windows backgrounds or really stick it to the man by grabbing a waifu from a wallpaper site.
You now have a Windows installation that should be fresh and clean. You can always go back and run these utilities again to make sure you've taken care of every nook and cranny, but even if you've got things locked down tighter than Alcatraz, there is one caveat you can't ignore.
No matter how hard you try, how many techniques you use from folder permissions to policy edits, Windows will eventually reinstall Microsoft Edge without your consent. Of course, the only way to truly avoid this is to never connect to the internet as even the strictest Windows Update settings can't hide from it.
Thankfully, you can fire up Revo Uninstaller again and unleash it on Edge whenever it returns. The frequency of which it rises from the ashes is becoming shorter, but as long as we retain control of our beloved Windows PCs, salvation is just a few clicks away.